Home Studio Recording Essentials: Complete Setup Guide
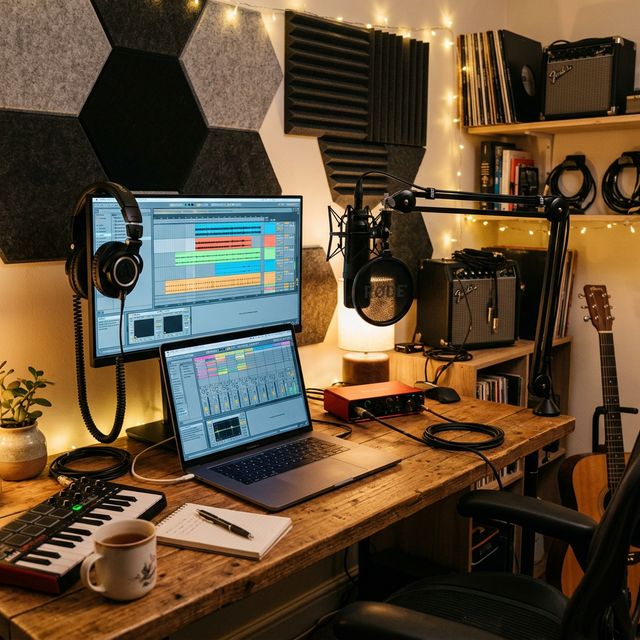
Build a professional home recording studio from scratch. Every piece of gear you need, why you need it, and how to connect it all.
Music Gear Specialist Review Desk
Gear Research & Analysis
ℹ️ Affiliate Disclosure: Music Gear Specialist earns from qualifying purchases through Amazon and other partner links. This doesn't affect our recommendations—we only suggest gear we'd use ourselves.
Building a home recording studio used to require a second mortgage. In the early 2000s, a decent audio interface alone cost $1,000+. Professional condenser microphones started at $500. Studio monitors were $800 a pair. The entire proposition was financially out of reach for hobbyists and independent musicians.
In 2026, the game has changed completely. Component costs have plummeted while quality has skyrocketed. A $170 interface today has better preamps than a $1,000 interface from 2010. A $100 condenser microphone captures detail that rivals $500 models from the previous decade. Free DAW software provides unlimited tracks and professional effects processing.
This guide covers every essential piece of gear you need to build a home studio that can produce release-quality recordings, the order in which you should buy them, and how to connect everything together.
The Signal Chain: Understanding How Audio Flows
Before buying anything, you need to understand how sound travels through your studio. Every piece of gear connects in a specific order called the signal chain:
Source (your voice, guitar, or keyboard) > Microphone or DI Box > Audio Interface (preamp + AD converter) > Computer running a DAW > Audio Interface (DA converter) > Studio Monitors or Headphones
The audio interface sits at the center of everything. It converts analog sound waves into digital data your computer can process, and then converts the processed digital audio back into analog sound you can hear through speakers or headphones. The quality of this conversion determines the fundamental ceiling of your recordings.
Essential Gear: What You Need (In Priority Order)
1. Audio Interface - The Foundation
The audio interface is the first thing you should buy because nothing else works without it. Your computer’s built-in sound card is not designed for recording. It introduces unacceptable latency (the delay between singing into a mic and hearing yourself in your headphones) and uses consumer-grade converters that add noise and reduce dynamic range.
Focusrite Scarlett 2i2 (4th Gen) - $180: The most recommended beginner interface on the planet, and for good reason. Two preamps with switchable “Air” mode for vocal presence, USB-C connectivity, and rock-solid ASIO drivers on Windows. The direct monitoring switch lets you hear yourself with zero latency while recording.
Focusrite Scarlett 2i2 on Amazon
Universal Audio Volt 2 - $220: If you want a slightly warmer, more “vintage” preamp sound, the Volt 2 features Universal Audio’s 610 tube preamp emulation mode. It adds a subtle harmonic richness to vocals and acoustic guitar that the Scarlett does not provide.
Universal Audio Volt 2 on Amazon
Audient iD14 MkII - $300: The step-up choice for producers who want professional-grade preamps from Audient’s large-format recording console line. Two preamps, ADAT expansion for adding more inputs later, and a scroll-wheel monitor controller that makes mixing on headphones ergonomic.
For a deeper comparison of interface options, read our best audio interfaces for Mac roundup.
2. Studio Headphones - Your First Monitoring Tool
Buy headphones before studio monitors. Studio monitors require acoustic treatment to be accurate, which adds hundreds of dollars to your setup cost. Headphones give you reliable monitoring from day one without room acoustics interfering.
Audio-Technica ATH-M50X - $150: The industry-standard closed-back monitoring headphone. Slightly hyped bass and treble give you an engaging listening experience while still being accurate enough for tracking and basic mixing. The detachable cable and foldable design make them road-worthy.
Audio-Technica ATH-M50X on Amazon
Sony MDR-7506 - $100: Used in every professional recording studio and broadcast facility on Earth since 1991. They are not glamorous, but their midrange accuracy is legendary. If your vocals sound good on 7506s, they sound good everywhere. Read our complete studio headphones comparison for more options.
3. Microphone - Capturing Sound
Your microphone choice depends entirely on what you plan to record most often.
For Vocals and Acoustic Instruments: A large-diaphragm condenser microphone captures the full frequency range and subtle details of the human voice and acoustic guitar strings. The Audio-Technica AT2020 ($100) is the best budget option. The Rode NT1 5th Gen ($270) is the upgrade that many home studios never outgrow, featuring the lowest self-noise of any studio condenser on the market.
Audio-Technica AT2020 on Amazon
For Guitar Amps and Loud Sources: A dynamic microphone handles high sound pressure levels without distortion. The Shure SM57 ($100) has been the standard for guitar amp recording since 1965. It is practically indestructible and sounds great on snare drums, guitar cabinets, and even vocals in a pinch. Check our guide on how to mic a guitar amp for placement techniques.
4. DAW (Digital Audio Workstation) - Your Recording Software
The DAW is where you record, edit, arrange, mix, and master your music. The good news: you do not have to spend money here initially.
Free Options:
- GarageBand (Mac/iOS): Clean interface, built-in instruments and loops, and a direct upgrade path to Logic Pro.
- Cakewalk by BandLab (Windows): A full-featured professional DAW that is completely free. Unlimited tracks, built-in effects, MIDI editing.
- Reaper ($60 license, unlimited free trial): Cross-platform, incredibly lightweight, infinitely customizable. The trial never expires, but you should pay if you use it regularly.
Paid Options:
- Logic Pro ($200, Mac): The most complete DAW for the money. Hundreds of built-in instruments, effects, and loop packs.
- Ableton Live Standard ($350, Mac/Windows): The best DAW for electronic music, beat making, and live performance.
- PreSonus Studio One ($400, Mac/Windows): Drag-and-drop workflow that many users find the most intuitive of any DAW.
5. Studio Monitors - Hearing the Truth
Studio monitors are speakers designed to reproduce audio flat and accurately, without the bass boost and treble hype that consumer speakers add. When your mix sounds good on flat monitors, it translates well to car speakers, earbuds, and Bluetooth speakers.
Yamaha HS5 - $200 each ($400/pair): The modern descendant of the legendary Yamaha NS-10, which was the most used studio monitor in professional studios for 30 years. The HS5 has a tight, controlled low end and honest midrange. It is not flattering, it is accurate. That is the point. For the full monitor shortlist, compare our best studio monitors under $500 guide before choosing woofer size.
KRK Rokit 5 G4 - $180 each ($360/pair): Slightly more bass-forward than the Yamahas, which some producers prefer for hip-hop and electronic music production. The built-in DSP room correction EQ helps compensate for untreated room reflections.
Important: Place monitors at ear height, forming an equilateral triangle with your head. Each monitor should be the same distance from the nearest wall. Use isolation pads (like the Auralex MoPADs) underneath to decouple them from your desk, which prevents bass frequencies from resonating through the furniture.
6. Acoustic Treatment - Taming Your Room
Your room is the most important and most overlooked “piece of gear” in a home studio. Untreated rooms have reflections, standing waves, and frequency buildups that completely distort what you hear through your monitors.
You do not need to turn your spare bedroom into an anechoic chamber. Four to six 2-inch thick acoustic absorption panels placed strategically will transform your monitoring accuracy:
- Two panels at your “first reflection points” on the side walls (the spots where sound from your monitors bounces off the wall and hits your ears)
- Two panels on the wall directly behind your monitors
- One or two panels on the ceiling above your listening position
DIY Option: Build your own panels from Owens Corning 703 rigid fiberglass wrapped in breathable fabric. A set of six panels costs roughly $100-$150 in materials and a Saturday afternoon of work.
Pre-Made Option: The Auralex Acoustics Studiofoam Wedges ($80 for a 12-pack) work adequately for small rooms, though rigid fiberglass panels are significantly more effective at absorbing low-mid frequencies.
Connecting Everything Together
Here is the exact signal flow for a basic two-input home studio:
- Connect your audio interface to your computer via USB-C
- Plug your microphone into Input 1 on the interface using an XLR cable
- Plug your guitar or bass into Input 2 using the Hi-Z (instrument) input with a standard 1/4-inch cable
- Connect your studio monitors to the interface’s line outputs using balanced TRS cables
- Plug your headphones into the interface’s headphone output
- Install your DAW, select the audio interface as your input and output device
- Set your buffer size to 128 or 256 samples for recording (low latency) and 1024 for mixing (stable CPU)
That is the entire physical setup. Five cables, one USB connection, and your studio is operational.
Common Mistakes to Avoid
Spending too much on a microphone before treating your room. A $1,000 Neumann condenser in an untreated bedroom sounds worse than a $100 Audio-Technica in a treated room. The microphone captures everything, including every reflection and resonance in your space.
Ignoring cable quality. You do not need $50 audiophile cables, but the $3 cables from the bargain bin introduce noise and fail at the worst possible moments. Spend $10-$15 per cable on brands like Hosa, Mogami, or Planet Waves.
Mixing exclusively on headphones without reference checks. Headphones eliminate room acoustics from the equation, but they also present a stereo image that does not exist in the real world. What sounds perfectly panned on headphones can sound completely different on speakers. Always check your mixes on at least two different playback systems.
Buying gear you do not need yet. Outboard compressors, external preamps, multiple microphones, and MIDI controllers are all useful tools, but none of them are essential for your first year of recording. Master the fundamentals with the minimum setup before adding complexity.
Related Reading
Music Gear Specialist Review Desk
Research-based reviewsResearch-based reviews · Manufacturer specs · Verified owner feedback
We review guitars, amps, pedals, and recording gear the honest way: spec sheets, published measurements, and the collected experience of working musicians and verified owners.